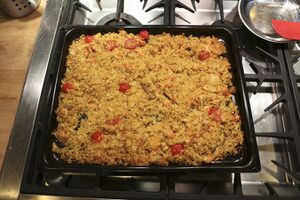
Chingri malai roti - king prawn roti: (rice cake with king prawns). This is my variation on Murghi roti but using king prawns instead of chicken.
Try this using two pans, see Chef's notes below.
Please be very careful if storing cooked rice. Refrigerate the moment it has cooled and use within 1 day
| Chingri malai roti | |
|---|---|
 |
| Chingri malai roti after grilling, sprinkled with toasted sesame seeds | |
| Servings: | Serves 4 |
| Calories per serving: | 164 |
| Ready in: | 45 minutes |
| Prep. time: | 25 minutes |
| Cook time: | 20 minutes |
| Difficulty: | |
| Recipe author: | Chef |
| First published: | 8th December 2013 |
|
Best recipe reviewYOU MUST MAKE THIS! 5/5 Without a shadow of doubt this is the best Indian recipe, ever. his, and the other variants listed are just sublime. Make the effort to make it. |
-
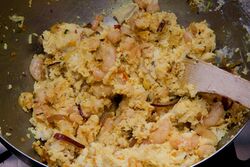
Chingri malai roti - prawns mixed in and ready to fry
-
The ingredients for Murghi roti - very similar]]
-
An easier way to prepare the grated coconut - Action coconut scraper with vacuum suction base - £8.98 Amazon UK
Ingredients
Printable 🖨 shopping 🛒 list & 👩🍳 method for this recipe
- 200 g (8 oz) uncooked basmati rice.
- 1 pack of king prawns - about 200 / 300 g
- 2 tablespoons ghee or vegetable oil
- 5 fat garlic cloves, peeled and crushed
- 5 cm (2") ginger, peeled and roughly grated
- 75 g (5 oz) onions, peeled and finely chopped
- 1 fresh coconut, flesh grated - don't be too precise with the grating, it's quite nice to have some meaty chunks mixed in.
- 4 hot chilli peppers (red or green), finely chopped - de-seeded if desired
- 1 tablespoon lime juice
- Fresh basil leaves, chopped or roughly torn.
spices
don't grind the spices, leave them whole
- 2 teaspoons whole coriander seeds
- 1 teaspoon whole cumin seeds (white)
- 1/2 a teaspoon of whole fenugreek seeds
- 1 teaspoon turmeric powder
Method
- Quickly wash and drain the rice but don't rinse it as you normally would, this dish is best with rice of a starchy consistency.
- Cook in boiling water for 7 to 11 minutes.
- Rinse the cooked rice in cold water until it is cold. Drain well.
- Add the rice to a food processor with a metal blade and blend to a thick creamy purée - adding a little milk if required to make it thinner. Remember, the inside is not going to change much whilst being cooked and will remain at roughly the same consistency as it was when first mixed.
- Heat the ghee in a frying pan or wok and stir-fry all of the spices for half a minute, then add the ginger and garlic and allow them to cook for a minute or so.
- Add the onion and reduce the heat a little and let them cook until translucent; about 5 minutes.
- Add the raw deveined king prawns, coconut and chilli to the onions, mix well and immediately remove from the heat.
- Lightly oil a large non-stick oven proof frying pan put on a medium heat.
- Add the prawn mix to the rice purée and tip this into the pan.
- Ensure the mixture is evenly distributed and patted down, then cook for about 10 minutes or until the rice cake has properly solidified and the base has started to toast - a little burning is quite nice as it leaves a nice chewy, toasted flavour.
- Preheat the grill.
- brown under the hot grill just to colour the top surface a little.
- Sprinkle with lime juice and fresh basil leaves and serve immediately.
Chef's notes
Having made this many, many times now, I'm coming to the conclusion that the best part is the glorious toasted crunchy outsides. In future I will use two pans and made two thinner individual rotis.
I heeded my own advice and tasted the coconut before preparing it. It was totally rancid, thank you Morrisons. Luckily I had both coconut flakes and desiccated coconut. For two people, I used two big handfuls of flakes and 4 tablespoons of desiccated coconut soaked in boiling water for 5 minutes then drained in a sieve. It worked fine and saved the day!
Variations
Instead of fresh green chillies, I have used 3/4 teaspoon of diced ancho & 3/4 teaspoon diced chipotle (dried) chillies.
Doing a 'freezer clean out', we made a marvellous version of this with 1 chicken breast and a bag of cooked red kidney beans. The chicken was thinly sliced and sautéed with lots of crushed garlic and the kidney beans fried with the chicken and mashed down a little - rather like re-fried beans. This was added in place of the normally cooked chicken in this recipe.
A better way of cooking this
After making variants of this for many years, I've discovered the best method of cooking is to spread the ingredients out on a lightly greased baking tray and bake at 220° C (425° F - gas 7) for 35 minutes, stirring up the contents every 10 minutes. It might be an idea with a meat other than crayfish, to add the meat (or prawns) for the last 10 minutes so they don't dry out.

See also
- Crayfish and coconut rice cake with hot chillies - My favourite of all these versions!
- Roti: The Indian yeast free bread
- Chingri malai roti: A main course rice dish with coconut, chillies, rice and king prawns
- King prawn and coconut roti with tomatoes, chillies and ginger, a version of above with chopped tomatoes
- Murghi roti: A main course chicken and rice dish with coconut, chillies and spices
- Murghi roti with nectarines and extra coconut: A fruity version of the above
- Beef strip roti: A beef version of murghi roti
- Get chicken pieces the economical way, joint the chicken yourself
- Action coconut scraper with vacuum suction base, a brilliant way to extract grated coconut.
Peeling ginger
There is no need to peel ginger. As a result of attending a Thai cookery demo, we have learnt that peeling ginger is unnecessary unless for aesthetic purposes as the skin is high in fibre and full of flavour. However, do remove any bits that have become tough or woody.
Discover Cookipedia's Culinary Creations on Pinterest
Explore the vibrant world of Cookipedia through our Pinterest page! We've curated a stunning collection of recipes that highlight the beauty of home-cooked dishes. It's the perfect way to visually navigate our extensive recipe library and get inspired by the flavours we’ve shared over the years. Dive in and discover your next favorite meal—one picture at a time!
#chingrimalairoti #rice #kingprawns #garlic #basil #ghee #grill #limejuice #desiccatedcoconut #grated #ginger

![The ingredients for Murghi roti - very similar]]](/wiki/images/thumb/a/a7/Murghi_roti_ingredients.jpg/250px-Murghi_roti_ingredients.jpg)
