Home-made Stilton-type cheese
This recipe requires preparation in advance!
Make Stilton cheese at home! (Well, Stilton-style cheese if you want to be picky!)
| Home-made Stilton-type cheese | |
|---|---|
 |
| OK, I couldn't wait 3 months. This was incredible after 1 month! | |
| Servings: | Servings: 20 - Makes about 1 kg of Stilton-type cheese - may reduce in weight slightly after maturing. |
| Calories per serving: | 576 |
| Ready in: | 6 days |
| Prep. time: | 6 days plus maturation period |
| Cook time: | None |
| Difficulty: | |
| Recipe author: | Chef |
| First published: | 22nd October 2012 |
|
Best recipe reviewBetter than Roquefort 5/5 So pleased with this, it was better than stuff we bought in France! |
Prepare 24 hours in advance!
Remember, you need to prepare the freeze dried Penicillium Roquefortii 24 hours in advance of making the cheese. I always forget.
A month or so on, and I can report this was an absolute success. Very creamy, almost runny, every bite seems to have a slightly different flavour. Totally recommended!
Ingredients
Printable 🖨 shopping 🛒 list & 👩🍳 method for this recipe
- 6 litres full cream milk (I used pasteurised, shop-bought milk)
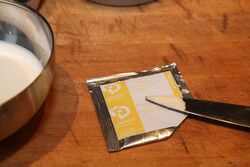
- A little DVI starter (see picture)
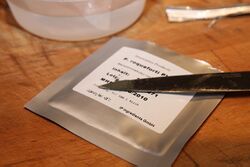
- Freeze dried Penicillium Roquefortii (see picture)
- 2 ml rennet
- Table salt (28g per 1200g of curd)
Mise en place
Prepare the Penicillium Roqueforti mould culture
- Boil a little water and allow to go cold.
- Pour 150 ml of the cold, sterilised water into a lidded container.
- Whisk up a small amount of freeze dried Penicillium Roquefortii (see picture) into the cold, boiled water so the powder is held in suspension.
- Cover and refrigerate for up to 24 hours - use within 3 days
- Sterilise all equipment
Method
Setting the curds
- Using a double boiler pre-warmed to 29°C, add the cold pasteurised milk and slowly bring the milk temperature to 29°C
- Whisk the DVI starter into a little of the warm milk and re-introduce the milk suspension into the boiler.
- Pour the Penicillium Roquefortii mould culture into the warm milk. Whisk to mix. Cover with a clean tea-towel and leave for 30 minutes.
- Add 2ml of rennet to 1 tablespoon of cold, previously boiled water, mix well and add to the milk.
- Whisk to mix, cover and leave in a warm place (about 22°C) until the curd sets.
- Lay a boiled cheesecloth on a draining mat and then ladle all of the curds on to the cheesecloth. The picture shows 3/4 of the curds - I had to put the rest into a second tray.
- Fold to cover the curds and leave to stand in the whey for 60 minutes.
- Wind one corner of the cheesecloth around the other three corners to make a Stilton knot (a kind of noose).
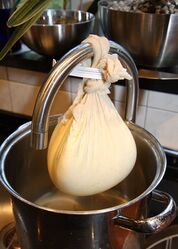
- Hang the bag up to drain off the whey.
- Every 30 minutes for the next two hours, tighten the bag a little more.
Salting and packing the curds
- After 2 hours, cut the curds into walnut-sized cubes.
- Sprinkle the cubes evenly with table salt at a ratio of 28g per 1200g of curd.
- Pack the curds into unlined moulds but don't compress them. (I used a colander as a mould for this batch)
- Leave the curds for 5 days, turning daily to ensure it can still drain freely. I stored mine in a the salad container in the fridge with a bowl of water in a vain attempt to maintain humidity. Ideally a little warmer (cave-like) would be more ideal.
- After 5 days, the cheese should have shrunk away from the sides of the mould.
- Use a spatula to rub the surface of the cheese flat so there are no holes on the outside.
- Cover with cling-film or rub with vegetable oil to seal the surface and leave to mature in a cool damp place. Again, if you have a cave, that would be ideal! Try to maintain a degree of humidity if possible.
- After 5 days, remove the cling-film and create the airways for the veining to form by piercing the cheese at regular intervals with a sterilised knitting needle or kebab skewer. (Take a close look at the high-resolution image of Stichelton cheese to see how the commercial cheese makers do this.)
Leave to mature for as long as you can bear! A wooden or wicker plate is good for this as it won't make the cheese sweat. The ideal conditions are 8°C to 12°C at 90% humidity.
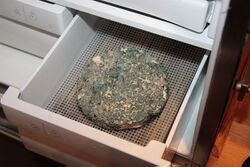
Unless you have a cave handy, the fridge is probably the best place to mature your homemade cheese although it's really going to be too cold. After discovering the top shelf of my often-opened fridge could be as much as 5° C warmer than the bottom, I've decided to mature my cheeses there. As all fridges differ, check various areas of your fridge with a thermometer to find the area that is around 11°C [51° F], the ideal 'cave' temperature.
-
After 1 month, in its fridge 'cave'. On a cheese mat, atop a piece of wood, over a pool of water in the salad crisper.
-
Packed in mould - leave 5 days
-
Salting the curds
-
Improvisation - draining the whey - step 9
-
Ladled onto a cheese cloth, step 7 (about 3/4 of the total quantity)
-
P.R. Knife-tip, used to treat 6 litres of milk (would probably do much more)
-
DVI - Knife-tip, used to treat 6 litres of milk (would probably do much more)
Variations
If you wish to produce White Stilton, follow the above recipe, just omit the Penicillium Roqueforti and ignore ther skewering stage.
Chef's notes
Don't worry about how much 'extra' water you add through the various stages because as soon as the cheese separates, it will just become part of the whey which is then of course discarded.
The original recipe used 4.5 litres of full-fat milk. I increased the amount to 6 litres. This produced about 1.2 kg of set curds at the packing stage. Temperature and humidity are very important.
I have been known for a certain degree of impatience, not least when it comes to waiting for cheese to mature! Well, after a week in wraps and a further week in the fridge at 8°C, sitting over a bowl of water in the salad crisper, I was most disappointed not to have a neatly veined piece of blue cheese. Pondering this dilemma on the hottest day of the year, I thought maybe a few days in a homemade humidifier, placed in our cool garage, might help things along a little. The next morning when I scampered out to the garage to check progress, my pure white Stilton had overnight, turned into a huge blue furry football! A quick check of my minimum-maximum thermometer showed that it had got as warm as 22°C - far too warm, hence all the fur. Rubbed clean of its blue fur coat, crumbled and re-constituted into a Stilton cylinder, it is back in the fridge and there it will stay for the next 3 months - caveat nibbler.
Discover Cookipedia's Culinary Creations on Pinterest
Explore the vibrant world of Cookipedia through our Pinterest page! We've curated a stunning collection of recipes that highlight the beauty of home-cooked dishes. It's the perfect way to visually navigate our extensive recipe library and get inspired by the flavours we’ve shared over the years. Dive in and discover your next favorite meal—one picture at a time!
#curds #homemadestiltontypecheese #whey #dvistarter #penicilliumroqueforti #penicilliumroquefortii #pasteurised #homemadecheese #fridge #stilton #sticheltoncheese


