Home-made Caerphilly cheese
This recipe requires preparation in advance!
Caerphilly cheese is a semi-hard cheese that originates from Caerphilly, Wales. It is a fast-ripening, acidic tasting cheese. The cheese is especially good if made from ewes' milk.
Well, I can't resist meddling, so although this started as Caerphilly cheese, it may end up as something completely different as I have also added 300 ml of double cream to the milk.
As I update these notes, the cheese is only 6 days old and more than half of it has been eaten! It is absolutely delicious and everyone who has tasted, nibbled, devoured it, thought it wonderful. It has an acidic tang with a really creamy after-taste. An absolute success. Making more today to see if I can get a batch to reach maturing age before being eaten.
| Home-made Caerphilly cheese | |
|---|---|
 |
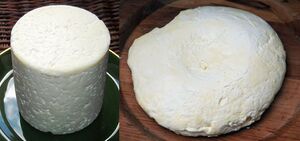
| Nice, respectable homemade Caerphilly cheese and the well-nibbled, improvised version! | |
| Servings: | Servings: 25 - Makes 750 g Caerphilly cheese |
| Calories per serving: | 100 |
| Ready in: | 4 hours |
| Prep. time: | 4 hours plus maturation period |
| Cook time: | None |
| Difficulty: | |
| Recipe author: | Chef |
| First published: | 2nd January 2013 |
|
Best recipe reviewI remember making this 4.6/5 I kept nibbling at it as it was maturing, just to test it, you understands. :D |
Ingredients
Printable 🖨 shopping 🛒 list & 👩🍳 method for this recipe
- 5 litres, full fat milk
- 5 ml liquid starter or a little DVI (an aspirin sized heap)
- 1.5 ml rennet
- Salt for Dry salting:
- *Dry salting, 1.5% per weight of curd (15g to 1 kg of curd)
- Brine concentrate: 18% (180 ml salt [12 level tablespoons] per 1 litre of water)
Mise en place
- Sterilise all equipment
-
Lightly pressing (3 kg)
-
Dry-salting the small pieces
-
Draining the curds
-
Press the sieve down and drain with a ladle
Method
- Pasteurise the milk in a double boiler and leave to cool to 30° C.
- Add the liquid starter or sprinkle om the DVI and leave for 30 minutes.
- Dilute the rennet in 5ml of cold boiled water and add to the milk.
- Mix well.
- Leave until the curd sets. This should take about an hour or so but may take longer.
- Once set, cut the curds into 6mm cubes and leave for 15 minutes, gently agitating the pan now and then.
- Very gently, over a 30 minute period, increase the temperature to 34°. I find the most reliable way to do this is by adding a little boiling water to the water already in the double boiler. This prevents you raising the temperature too quickly.
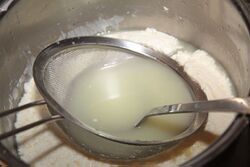
- Using a ladle, drain off as much whey as you can without further breaking up the curds. Try to keep the temperature at 34° (covering with a cloth or working in a warm environment helps here). {Just discovered a really neat way to speed up the curd draining. Rather than fiddle about with a ladle at the edge of the pan, press down gently with a sieve and ladle the whey from the middle of the sieve. See picture.}
- After 30 minutes, remove blocks of curds and pile them in a heap onto a cheesecloth placed over a cheese draining mat. A (very clean) fish-slice is good for this.
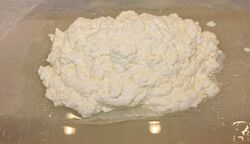
- After 20 minutes, break the curds into much smaller pieces and dry-salt them (2%).
- Lift the cheesecloth and place into your mould. I used a colander.
- Wrap and cover and lightly press (I used about 3 kg of weight).
- After 1 hour, turn the cheese over and sprinkle with salt. Leave it pressing for 24 hours.
- The next day, make up an 18% brine solution and immerse the cheese for 24 hours.
- Allow to dry and allow 2 weeks to ripen.
- Unless you have a cave handy, the fridge is probably the best place to mature your homemade cheese although it's really going to be too cold. After discovering the top shelf of my often-opened fridge could be as much as 5° C warmer than the bottom, I've decided to mature my cheeses there. As all fridges differ, check various areas of your fridge with a thermometer to find the area that is around 11°C [51° F], the ideal 'cave' temperature.
Chef's note
Most cheesemaking recipes I have seen mention pasteurising the milk first. This assumes you have unpasteurised milk which, though better for cheesemaking, can be difficult to obtain unless you have your own dairy. If like me, you are using shop-bought, pasteurised milk, ignore the pasteurising step. Just start with the milk at 30° C.
If you are using cream, add it with the milk after the pasteurising step (assuming it is already pasteurised). I used double cream, which gives it a really creamy after-taste but single cream would be just as good. The amount of milk is not overly important either as long as your draining system and mould is large enough.
The recipes I have seen suggest rubbing the cheese with flour to 'finish' it. I am uncertain about this as I feel it's likely to form an undesirable mould, as bread does. I would welcome comments on this.
Discover Cookipedia's Culinary Creations on Pinterest
Explore the vibrant world of Cookipedia through our Pinterest page! We've curated a stunning collection of recipes that highlight the beauty of home-cooked dishes. It's the perfect way to visually navigate our extensive recipe library and get inspired by the flavours we’ve shared over the years. Dive in and discover your next favorite meal—one picture at a time!
#homemadecaerphillycheese #dvi #caerphillycheese #curds #drysalting #cheesemaking #cheese #doubleboiler #liquidstarter #curd #litres


