Kimchi recipe
This recipe needs advance preparation!
| Kimchi recipe | |
|---|---|
 |
| Servings: | Makes 1 jar - about 1 litre, depending up the size of the cabbage |
| Ready in: | 6 hours + fermenting time |
| Prep. time: | 6 hours |
| Cook time: | None |
| Difficulty: | |
| Recipe author: | JuliaBalbilla |
| First published: | 31st January 2013 |
Kimchi, also spelled gimchi or kimchee, is a traditional Korean fermented dish made of vegetables with varied seasonings, most commonly referring to the spicy baechu variety. Kimchi is the most common banchan, or side dish eaten at every Korean meal with rice. Kimchi is also a common ingredient and combined with other ingredients to make dishes such as kimchi stew (kimchi jjigae) and kimchi fried rice (kimchi bokkeumbap). Kimchi is so common in Korea cuisine that the Korea Aerospace Research Institute (KARI) developed space kimchi to accompany the first Korean astronaut to the Russian-manned space ship Soyuz.
Varieties of kimchi
Kimchi varieties are determined by the main vegetable ingredients and the mix of seasonings used to flavour the kimchi. The most popular type of kimchi is the baechu (a type of Chinese cabbage) variety but there are many regional and seasonal varieties. Popular variants include ggakdugi which is a kimchi made with cubed radishes, pa kimchi (made with spring onions),chonggakkimchi and oisobaegi, a cucumber kimchi with hot and spicy seasonings. Ggaennip kimchi features layers of perilla leaves marinated in soy sauce and vinegar and other spices.
Ingredients
Printable 🖨 shopping 🛒 list & 👩🍳 method for this recipe
- 1 whole head of napa cabbage (some supermarkets label as Chines lettuce)
- 4.5 tablespoons table salt
- 3 tablespoons ko choo kah rhoo - (ground chilli flakes)
- 5 fat Cloves of garlic
- Equal volume of fresh ginger, grated
- ½ of a ripe pear, peeled, cored and roughly chopped
- ½ of a ripe sweet apple, peeled, cored and roughly chopped
- ½ a medium onion, peeled and roughly chopped
- 2 tablespoon nam pla
- 3 large or 5 small spring onions, chopped
Mise en place
- Bear in mind that the cabbage needs to sit in the salted water for 5 hours before you make the kimchi.
Method
- Chop the cabbage into bite-sized pieces - it will further reduce in size after dehydrating
- Add the salt to about 250 ml of warm water and mix really well. the quantity is not that important as it will all be discarded.
- Place the cabbage pieces in a large bowl, pour over the salt liquid and toss the cabbage in the mixture.
- Cover with a tea-towel and leave at room temperature for about 5 hours, turning once or twice.
- After 5 hours, using a colander, rinse the cabbage under a cold running tap to wash off all the salt. Drain and set to one side.
- Mix the ground chilli flakes with about 5 or 6 tablespoons of water and mix to a paste.
- Add the chilli paste, garlic, ginger, apple, pear and onion to a food processor with a blade and bland to a paste. Add a little water if it makes it easier to blend.
- Add 2 tablespoons of nam pla to the cabbage together with the chopped spring onions and garlic-chilli paste.
- Add 250 ml of cold water and wearing rubber gloves to protect your hands, mix really well so everything is evenly combined.
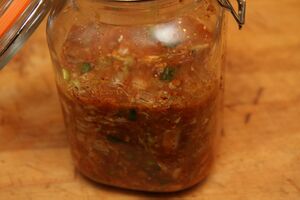
- Pack the mixture into a sterilised kilner-type jar. Don't fill right to the top. You don't need as much room as pictured. It was the only jar I had, a smaller one would have done equally well.
- Don't close the lid, just cover with a tea-towel and leave for 24 hours at room temperature to ferment.
- After 24 hours, seal and store in the refrigerator where it will continue to ferment.
- It should last for about 1 month, the longer it is kept, the more sour it will become. Apparently, the best kimchi to use for kimchi jjigae is old, sour kimchi.
Illustrated stages
-
Just bottled, ready to ferment
-
Kimchi, ready to bottle
-
Mix well using rubber gloves
-
ko choo kah rhoo, mixed with water
-
Napa cabbage after salting for 5 hours
-
Napa cabbage in salt solution
-
Napa cabbage and salt solution
-
Napa cabbage (Chinese lettuce)
Peeling ginger
There is no need to peel ginger. As a result of attending a Thai cookery demo, we have learnt that peeling ginger is unnecessary unless for aesthetic purposes as the skin is high in fibre and full of flavour. However, do remove any bits that have become tough or woody.
Discover Cookipedia's Culinary Creations on Pinterest
Explore the vibrant world of Cookipedia through our Pinterest page! We've curated a stunning collection of recipes that highlight the beauty of home-cooked dishes. It's the perfect way to visually navigate our extensive recipe library and get inspired by the flavors we’ve shared over the years. Dive in and discover your next favorite meal—one picture at a time!


